⚠️ SAFETY FIRST: Before making any technical changes or editing your site’s code, please ensure you have a full backup of your website and database. If you aren’t comfortable editing files, consider using a staging site first. Need professional help? [Contact Us].
If you are looking to increase maximum file upload size in WordPress, you’ve likely run into the frustrating ‘upload_max_filesize’ error.
By default, many hosting providers set this limit as low as 2MB or 8MB—which is barely enough for a single high-resolution photo today.
The Symptom: What are you seeing?
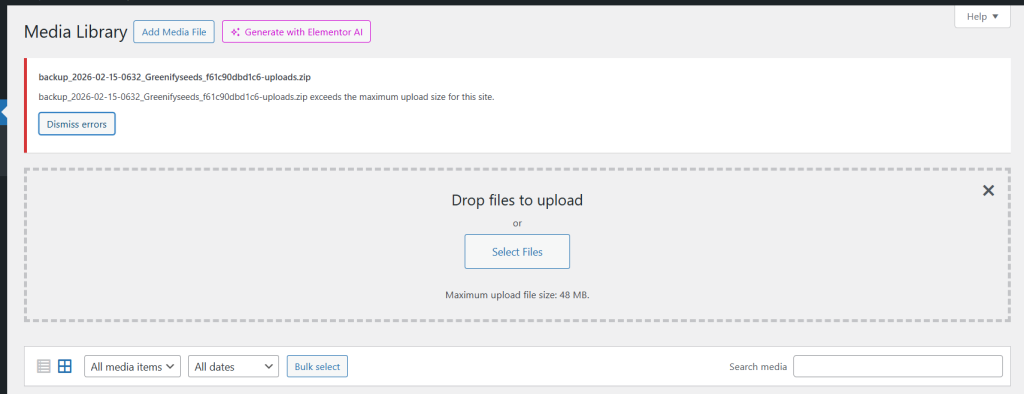
When you go to Media > Add New, you will see a small text label that says: “Maximum upload file size: 2 MB.” If your file is even 0.1KB over that limit, WordPress will block the upload and show a red error bar.
The Quick Fix (1-Minute Solution)
If you have a modern host with cPanel or Plesk, don’t touch any code yet!
- Log in to your hosting control panel.
- Search for “Select PHP Version” or “PHP Options.”
- Locate upload_max_filesize and change the dropdown from 2M to 64M or 128M.
- Do the same for post_max_size.
- Click Save.
5 Proven Methods to Increase Maximum File Upload Size in WordPress.
If the Quick Fix didn’t work, one of these technical methods will. We have ranked them from easiest to most advanced.
Method 1: The functions.php Method (Theme Level)
This is the easiest way to tell WordPress to request more “room” from the server.
- Step 1: Go to Appearance > Theme File Editor.
- Step 2: Open your functions.php file (preferably in a Child Theme).
- Step 3: Paste this code at the very bottom:
PHP
@ini_set( ‘upload_max_size’ , ’64M’ );
@ini_set( ‘post_max_size’, ’64M’);
@ini_set( ‘max_execution_time’, ‘300’ );
Method 2: The .htaccess Method (Apache Servers)
If you are on shared hosting (Bluehost, BigRock, MilesWeb etc.), your .htaccess file usually controls these rules.
- Step 1: Connect to your site via FTP or cPanel File Manager.
- Step 2: Find the .htaccess file in your root directory (public_html).
- Step 3: Add these lines at the bottom:
Plaintext
upload_max_filesize = 64M
post_max_size = 64M
memory_limit = 256M
Method 3: The php.ini or .user.ini Method
Some hosts require a dedicated configuration file in your root folder.
- Step 1: Create a new file in your root directory named php.ini (or user.ini).
- Step 2: Paste the following code:
Plaintext
upload_max_filesize = 64M
post_max_size = 64M
memory_limit = 256M
Method 4: The wp-config.php Method
While less common for upload sizes specifically, increasing your WP Memory Limit often fixes the “timeout” errors that happen during large uploads.
- Step 1: Open your wp-config.php file.
- Step 2: Add this line just before the “That’s all, stop editing!” message:
PHP
define(‘WP_MEMORY_LIMIT’, ‘256M’);
Prevention: How to avoid this in the future
- Use a Better Host: Quality hosts like Cloudways or SiteGround allow you to change these limits with a single click in their dashboard.
- Optimize Before Uploading: Use tools like TinyPNG to compress images. If your image is 10MB, it shouldn’t be on your website anyway!
- Check Site Health: Occasionally visit Tools > Site Health > Info > Server to ensure your limits haven’t been reset by a server update.
Still Stuck?
Sometimes, no matter what you code, the hosting provider hard-locks these limits. If you’ve tried all four methods and your limit is still 2MB, it’s time to contact your host’s support or [Let GetWpFixed handle it for you].
Next Post:How to Fix a Slow WordPress Website: The Ultimate 2026 Speed Guide